Showing posts with label Garden Seating. Show all posts

Thursday, July 21, 2011

Making a mosaic

Best Blogger Tips
Click here to see a video of the building of this project
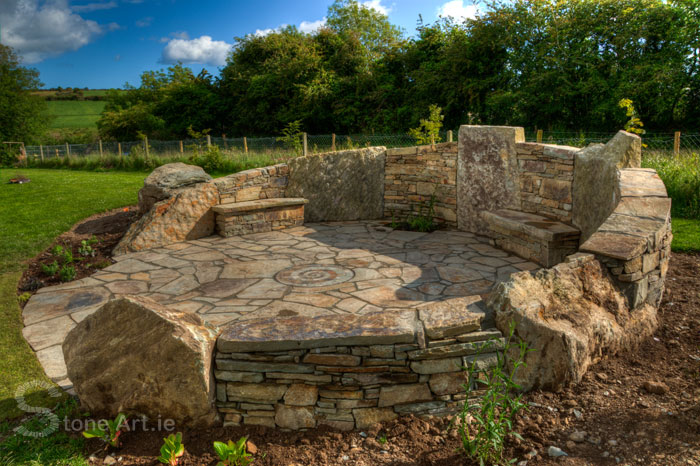
Here is a picture of a project I recently finished for an artist in West Cork. The mosaic in the center was actually a bit of an afterthought. The seating area was initially designed to have a fire pit in the center but later the client decided against the fire pit. I still wanted to have some sort of central feature, so I decided to put in a mosaic instead.
 I have been getting a lot of reaction to the mosaic I made for the center, I also have been getting some feedback from readers saying that they would like to see some more DIY projects posted on the blog. So I thought, why not show how I made this mosaic so people can give it a go themselves. 
Natural stone mosaic
I am in fact going to show two different ways of making mosaics. The first is made the more traditional way, using floor tiles of the same thickness, and the second way (which was a bit of an experiment) involved making a sort of upside-down mosaic cake!  

Mosaics are relatively easy to do and are a great project to get the whole family involved in. They make great features in a garden patio, on a wall or in a summerhouse. Anyone who has been to Gaudi’s, Park Güell, in Barcelona, Spain will know the endless creative possibilities with mosaic art.
The first mosaic I will demonstrate is the more conventional tile mosaic. This type of mosaic can be pre-made and slid into place later. This method is great because this means that it can be made on the kitchen table where the whole family can get around and be involved, it also means that it can be completed over a period of time.

This is in fact a mosaic I did for my parents some years back, I was finishing up a tiling job when I realised we were going to be short of tiles, the tiles were relatively cheap so the boxes came with many broken tiles. So I thought why not put the broken tiles to good use and make a mosaic (and save a trip to the tile store in the process).

So here are a few things you will need if you are going to give this a go!

The first step is to decide on your design, in my case it was a yin yang symbol, but be as creative as you like. Or if you are lacking inspiration, you can also find many mosaic designs and templates on the internet.
When you have decided on a design, transfer the design onto your sheet of plywood to the scale you desire.
Next stretch plastic wrap over the board (this will prevent the mosaic from sticking to the board). Then lay your tile mesh on the board. Use some tape or tacks to keep the mesh in place. If you are finding it difficult to see the design you may want to retrace the design onto the mesh.
If you are using old tiles try and use tiles of the same thickness as it will give you a more even finish. Also take care when breaking up the tiles as the tile fragments can be sharp, be sure to wear gloves and eye protection. It is also advisable to lay an old towel over the tiles as you break them to prevent the fragments from flying around the place.

Now you are ready to start laying the tiles. Using your paint brush put a blob of PVA glue on the back of each piece of tile as you position it on the mesh. (you want to be using enough glue to get a good bond with the mesh without getting to much excess glue squeezing out the sides and through the mesh)
 It can be quite tedious getting all the pieces to fit together like a big puzzle, but try not too worry about the gaps between the pieces as once they have been grouted you won't notice the gaps.
To fix the mosaic in place, get some tile glue either premixed or in powder form (just be sure that the glue is suitable for exteriors if the mosaic is outdoors, rapid set is also preferable). Using a tiling trowel spared an even layer of glue on the surface where the mosaic will sit, then carefully slide the mosaic into place. Lightly press down on the mosaic so that the glue starts to push through the mesh but try not to get it coming to the surface. Wipe off excess glue and leave to set. Once the glue is set to the manufactures specifications, mix up your grout (again make sure the grout is suitable for outdoors)  and squeeze into the gaps with a squeegee and remove residue with a sponge when it starts to set (usually only takes a few minutes). And there you have it, one finished mosaic!

So now I will show you the process I used to make the spiral mosaic for this seating area below.
Click here to see a video of the building of this project

So this mosaic was a bit of an experiment because I needed to make it off site, but I could not make it the conventional way (as above) either as I would be using natural stone which would be of variable thickness resulting in a very uneven finish so I decided I would try and make it similar to an upside down cake, that way the finished mosaic would be perfectly smooth and even.
Hole left in paving for mosaic
There are probably better ways of doing this, but I will now demonstrate the process I used to make this mosaic, using the materials I had to hand in my little garden shed.
So first of all, I knew I wanted to make a spiral and that it had to be a circular shape just under 80cm in diameter as this was the size of the hole I left in the paving for it.
I also wanted to use the same stone I used to create the surrounding paving, so before leaving the site I collected a number of pieces of stone averaging a thickness of about 1cm. In order to get a clear design I only selected pieces that were either light grey or dark brown, to maximize the contrast. I then took my measurements and my stone home with me to work on over the weekend.

So my first step was to come up with a design, I opted to go with a fairly simple spiral design as a very complex design would be very difficult to achieve using natural stone. I then transferred the design onto two large sheets of paper to get it to full scale. Remember if you are planning on trying one of these upside down type mosaics your template drawing should be back to front ( this is important if you have any lettering in your mosaic. Mine is just a spiral so it was not an issue)
I then attached the template onto a piece of plywood (approx 1m² in size) and drew a box around the outside of the circle. At the four points where the box and the circle meet, I attached pieces of 2”x2” timber onto the plywood, then using some strips of hardboard (nice and flexible) that I had laying in the shed, I created the circular mould that would contain the mosaic, by connecting the hardboard strips to the 2”x2” timbers I connected to the plywood.
I was now ready to start laying. (It is important to remember when laying the stone to put the side with the highest contrast facing down so that you end up with a better contrasting design when you're finished)
Laying completed
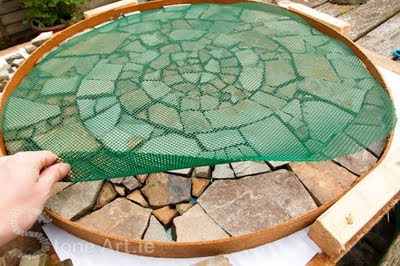
The picture above shows all the stones placed, however the contrast between the two coloured stones does not seem great. This is of course because we are looking at the underneath of the mosaic and I have the most contrasting sides of the stone facing away.
Next I got a large piece of plastic mesh and cut it to size (the mesh will help keep the mosaic in one piece and prevent it from cracking into little pieces when it comes to laying it later)
I then mixed up a half bag of cement fondue I had in the shed with some sand and water in a bucket into a creamy mixture (not too wet mind you) that would seep into the cracks  (a bag of quick drying cement should work fine as well)  I then poured half the mixture on to the mosaic and spread it out, careful not to move any of the stones.
I then added the plastic mesh and poured the rest of the mixture on top so that the mesh was sandwiched in the middle.
I then left it for a few hours to set. I waited till it was set long enough that it was hard but still soft enough that I could scratch the surface, the reason for this I will explain in a second. So the next task was to flip the mosaic over, to see if the experiment worked at to see if there was enough of a contrast between the two stones to show up the spiral properly.
To do this I put another sheet of plywood on top of the mosaic and screwed it into the 2”x2” timbers below, sandwiching the mosaic which allowed me to flip the mosaic over safely without damaging it. Then sliding the mosaic to the edge of the table I was able to take the screws back out and reveal my creation.
All that was left to do now was scrape any excess cement from between the cracks using a pointed tool (I used a pointed screwdriver and a nail) and brush clean. Because the cement was not completely set yet I was easily able to remove the excess glue.
From here the only thing left to do was transport the mosaic back to site and slide it into the hole on a bed of cement and grout it with a grey grout using the same technique mentioned earlier.
 So I hope this has inspired some of you to give mosaicing a go, and hopefully some of the information here will help you along the way. If you do give it a go, please post a photo of your mosaic creations (or indeed any of your other garden stone art creations) on my stone art facebook page so I can have a look. As for the rest of you who don't already know my facebook page do pop in and give us a 'like', I update the facebook page every few days with lots more interesting things as well as mini post, photos and more.

Sunday, May 8, 2011

More on Stone Benches

Best Blogger Tips
So I have talked about stone benches on a number of occasions, and now I am going to talk about them some more.
I just had a lady asking me for more information on some of my stone benches, and while compiling the information for her I thought, why not kill two birds with one stone and write a blog post about it.
So here it is!

Stone Benches.
Enrich your garden with one of Stone Arts trademark stone benches.  Each one of these immensely popular benches is completely unique and can create a completely new feel to any area of your garden. As they are built to look natural, the design of each bench is largely dictated by the style and shape of the stone used, as well as the location of the seat.
Each bench has been carefully constructed so that they are not only pleasing to look at, but are also comfortable to sit in.
Stone benches not only make great garden features, but they can also make beautifully unique memorials that can be appreciated for generations. They can also be engraved with any text or symbols on request.
Ireland has a rich history of stone seats throughout its history, click here if you would like to know more about Ireland's ancient stone chairs.
-------------------------------------------------------------------------------

Here is some more information on a few of the benches I have made to-date.

The Weedle Bench, Co. Kildare.

This stone seating area was built using quarried sandstone. It roughly measures 2.8 meters deep by 2.4 meters wide. It will comfortably seat 8+ people. Both the risers and the fill between the back rests are dry stacked stone.
The Weedle Bench

The Weedle Bench

Back Rest Detail, The Weedle Bench
The Weedle Bench
---------------------------------------------------------------------------------------------------------

  O' Donovans Seat, Co. Cork

This seat was built as part of a adults chill-out area. A place for the adults to escape the family and quietly sit in their own space, taking in the spectacular views over Bantry Bay, to the sound of the water feature beside them.
This seat was built from Kerry Limestone, rich in quartz. It comfortably seats two persons, complete with rustic arm-rests to rest your glass of wine on.
O' Donovans Seat

O' Donovans Seat

As the planting matures, the seating area will become hidden from the house, to become a little hidden treasure to be discovered.

O' Donovans Seat
--------------------------------------------------------------------------------------------

Hagal's Bench, Co. Cork

This bench also seats two people. It was built from local field stone. The bench is on a slight gradient and snakes along the garden, bringing shape into the garden. It has been positioned to get full benefit of the sun as well as the stunning views over the valley and distant sea.

Hagal's Bench

Hagal's Bench
-------------------------------------------------------------------------------

O' Sullivans Bench (Salmons Rest) Co. Cork

This seating area was built along a salmon fishing river over looking Carriganass Castle. The owner wanted a quite spot to sit and have his morning cup of coffee. It was also a spot where he could fish from, the quiet pool of water where the benches are located sits just above a waterfall, the salmon come and rest in the pool after climbing the waterfall (giving it its other name 'Salmon's rest seating area')

O' Sullivans Bench
 This seating area is made up of two stone benches opposite each other. They are about 2.4 meters in length and will seat three people each. Being built from stone these benches can also withstand the fury of the river during the winter rains (and summer rains)

O' Sullivans Bench

O' Sullivans Bench

O' Sullivans Bench
--------------------------------------------------------------------------------------------------

The Butterfly Bench, Co. Cork

This bench was built into an old garden ditch where the ditch had partially come away, rather than simply rebuilding the ditch, I recycled some of the stones to build this bench. The back was build from a piece of local quarried stone I butterflied to make a symmetrical back. This is also a two seater bench.


To see these and more of our stone benches on our website click here

Friday, March 11, 2011

This year for National Tree Week, why not let the trees do some art!!!

Best Blogger Tips
So it's National Tree Week again here in Ireland! Last year in my post Grow our own chairs for national tree week, I instructed ye all to go and create some art by growing a chair out of trees. (I have yet to hear from ye how that went). So this year, why not let the trees themselves make some art!
Picture from last years post 'Grow our own chairs for national tree week'

This is precisely what British artist Tim Knowles did back in 2005 when he started his series of art pieces, simply called ‘Tree Drawings’ Tim’s idea was to create a series of drawings produced using drawing implements attached to the tips of tree branches, the wind’s effects on the tree is then recorded on paper.  Like signatures, each drawing reveals the different qualities and characteristics of each tree.

All of his works rely on the logic of cause and effect, as a map of time and a record of actions governed entirely by chance.
 
Tree Drawing - Weeping Willow on circular panel [100 pen] 2005
Above, 100 pens attached to the branches of a Weeping Willow tree draw onto a circular disc 5.1 metres in diameter and made up of 10 segments.
Larch on Easel #1 2006

Scots Pine on Easel #1 2006


Similar projects by Knowles include his Vehicle Motion Drawings, where he constructed an apparatus to capture the motion of a car being driven, all the turns, stops, and starts of the vehicle move the pen over the paper. Another is  his postal projects, which capture the motion of packages sent through the postal system, using both drawings and photography.
Greek Pine on easel #1 2005

I think my favorite work of his is titled ‘Nightwalk - Valley of Rocks’.  
Nightwalks are a series of illuminated walks that Knowles created in the countryside during a new moon (to ensure complete darkness).
One of Tim Knowles contraptions
Over the period of an hour, the artist walked away from the camera while carrying three wide-beam torches fitted with diffusers. The lights are connected to a 12volt battery in a backpack to prolong their life. His path, along a precarious rocky ridge in the darkness, was illuminated and captured using a long-exposure, large-format photograph. The direction in many of his walks are also dictated by the wind by using various contraptions that plot the direction of the wind.
Nightwalk - Valley of Rocks 2008
Photos and info from Tim Knowles website. Be sure to check it out to see more of his amazing work
http://www.timknowles.co.uk

So it's still National Tree Week for a few days and there are still a number of events on this weekend right around the country. To find out what in happening in your area, follow the tree council of Ireland link http://treecouncil.ie/

2011 also happens to be the International Year Of The Forest. You can find out more about this here http://www.un.org/en/events/iyof2011/

Saturday, July 31, 2010

Stone seats, the building process.

Best Blogger Tips
A few months back I wrote a post 'Stone Chairs. Some ancient some not so ancient…Yet….' in which I mentioned that one of my favorite things to build are stone seats. Well here is a stone seating area I have just completed and the process I used to create it.


So recently a lady in down in Co. Kildare asked me if I could transform this old area of her garden into one of my stone seating areas, so of course I was only too happy to oblige.


My delivery of stone.


So when the old material has been removed, the risers are built up.


For the top of the seats I often use big chunky slabs of stone like this (if I can get them). Depending on their weight, sometimes I need to get a mini digger to move them into place. However as there was a little movement in these ones, I decided to move them into place the old fashioned way, by using round timber stakes and leverage. It is hard going, but there is something very satisfying about doing it all by hand.


So when the seat tops are finished it is time to make the backs of the seats. This is the part that truly makes each seat unique.
When possible, I will actually go to the stone quarry and walk around and pick out the stone myself for a project. Unfortunately it has become increasingly difficult to find quarries that will let you loose in the quarry to go around picking out stone, as they are worried about getting sued.

So in this case I was unable to pick the stone myself, so I had to give a very detailed shopping list of exactly what I needed. This brought its own challenges, as you have to work with what you are given.
I try not to alter the stone too much, as I like to keep the natural edges of the stone. This way you keep all the stone's imperfections, keeping the whole thing looking more organic.
Laying the stone out on the ground I work out the layout for the backs of the seats. 


It is good to do this beforehand as once you get the stone in place, you really don't want to be moving it again.


Over the years you do learn some clever ways of moving large pieces of stone around without breaking your back. With pieces like this I walk them into place by rotating them on one corner, then doing the same with the other, slowly edging forward.


When all the main backing stones are in place, the smaller stones can be built up in between as can the stone around the back of the larger slabs.


And that's it, piece of cake really!
Well maybe not, it is hard work but it is also very rewarding work. Creating something unique and artistic like this can totally transform a garden and can be enjoyed for centuries to come!