Showing posts with label Garden Construction. Show all posts

Saturday, March 22, 2014

Bloom 2013

Best Blogger Tips
Almost a year late, but here is the story of my involvement in Bloom in the Park garden show last year.
Tim Austen's Gold winning garden at bloom

Outdoor classroom under
construction during spring 2013 
Picking up icy cold stones in January of 2013 as the winter was slowly easing its grip on the country, I powered on through the cold in a bid to get my outdoor classroom project completed for my May deadline.
It was during this time that I was contacted by renowned Irish landscape designer Tim Austen. A regular medal winner at Bloom, Tim was designing a large garden for the competition and was wondering if I would be interested in creating one of my mosaic panels as a centre piece for his garden.   

Aquilegia vulgaris ‘Black Barlow’ standing proud in front of my mosaic panel.  
Being a fan of Tim's previous show gardens, I was delighted to be a part of his latest garden.
Tim Austen's Giardino della mostra 
As Tim explains on his website  Giardino della mostra, translating generally from the Italian as “exhibition garden” or “garden of exhibits,” is a garden that encourages you to design your own garden to a strong theme whilst referring to the fact that a good garden is formed from the sum of its parts. The concept and layout are, in part, inspired by Ireland’s only permanent exhibition of show gardens at Gardenworld, Kilquade (the National Garden Exhibition Centre), Co. Wicklow. Here a wonderful collection of individual gardens, arranged around the central avenue, collectively inspire and encourage gardeners at all levels to follow a design in their own gardens. The central avenue, with water features and arches are the main elements that are referenced in Giardino della mostra, along with beech hedging that forms a soft backdrop to the garden. Moving through the garden, areas of differing character are also seen.
Tim Austen's Giardino della Mostra
Unfortunately for me the garden show was on the weekend before the completion date for my outdoor classroom project so this meant that I would be spending many weekends over the next few months in the studio.

When making mosaic panels (as well as other stone art pieces) I try and see if the client has any connection with any particular stone. In this case, as Tim is a proud Wicklow man, and golden granite being the stone of Wicklow, we decided to incorporate granite into the mosaic.
So my first task was breaking up chunks of granite into usable pieces for the mosaic.
At work in the studio with help from my lovely wife. 
As the workload started to mount up, working on both the outdoor classroom and the show garden, I called in reinforcements to help. Help with the mosaic came from my wonderful supportive wife Christine who came and helped out with completing the mosaic work.
Christine cleaning the mirror

Back on site, work was commencing with the garden. There was some friendly rivalry between designers on site, and they were often seen walking the grounds checking out the competition. It was for this reason that Tim wanted to keep the mosaic secret only to be installed for the big reveal at the end. The framework for the mosaic did have to be installed earlier in the build, so to keep people guessing 'flatscreen TV here' was written on the framework to throw the rivals off.
Installing the mosaic. Photo Tim Austen
   Tim had a really great crew working with him on the garden, and it took most of them to help me get the mosaic into place. Made of natural stone and cement, it weighed well over 200kg. 
The finished piece. 220cmx 120cm granite, Liscannor sandstone and mirror mosaic panel by Stone Art
Tim was also keen for me to be involved in two of the other stone features in the garden, the old forest-like dry stone wall and one of the water features. As I was short on time I thought this would be a great opportunity for some of The Dry Stone Wall Association of Ireland to get involved in the project. Two good friends of mine from the DSWAI Ken Curran and Alex Panteleyenko  took over the responsibility for this from me and did a really wonderful job of making a dry stone wall look like it has been sitting there for decades. 
Dry stone wall built by DSWAI members Ken Curran and Alex Panteleyenko. Photo Ken Curran
Finished wall surrounded with woodland shade planting and a bronze sculpture by Eamonn Ceannt  
Limestone pebble water feature by Stone Art
Unlike the mosaic panel, the water feature had to be made on site. Tim was inspired by the free flowing pebble work of UK artist Johnny Clasper and wanted something similar. I first contacted Johnny to see if he wanted to come over to do it but unfortunately he was busy with show gardens in the UK at the same time. So I decided to do it myself. So I would spend the next three days on my knees in the garden building the water feature, and it would have been even longer had Alex Panteleyenko not stuck around for an extra day after finishing the dry stone wall to help get me started with the water feature.
Myself and Alex setting the first stones in the water feature. Photo Tim Austen
Slow progress.
The finished piece.
I was delighted to see Tim win Gold for the garden. It was wonderful to be part of the whole process and look forward to future involvement in the show. It was great to see the reactions to the garden over the festival weekend. Tim's garden proved to be a big hit with many of the 110,000+ visitors who attended the show over the four days of the event.
Some of the 110,000+ people who visited Bloom in the Park last year 
The President of Ireland Michael D. Higgins and his wife chilling out by my mosaic.
Delicate blue flowers of Camassia cusickii (Cussick's camas)


Mosaic reflected on wet tiles on Tim Austen's Giardino della Mostra
Evening shot of the water features. Photo courtesy of Tim Austen
For more information about the garden and its designer check out Tim Austen's Website http://www.timaustengardendesigns.com/
If you have time check out this great short film about Tim's road to Bloom and the building of the show garden. Well worth a watch. 


Thanks again to Tim Austen for letting me be involved in the wonderful garden. I would also like to make a very special thanks to Alex who after Bloom was over came and helped me for a day to finish off the outdoor classroom which I am pleased to say also got finished on time.

Also of note. I custom make these mosaic panels in all shapes and sizes so be sure to contact me with your enquiries should you want one for your garden.

Thursday, July 21, 2011

Making a mosaic

Best Blogger Tips
Click here to see a video of the building of this project
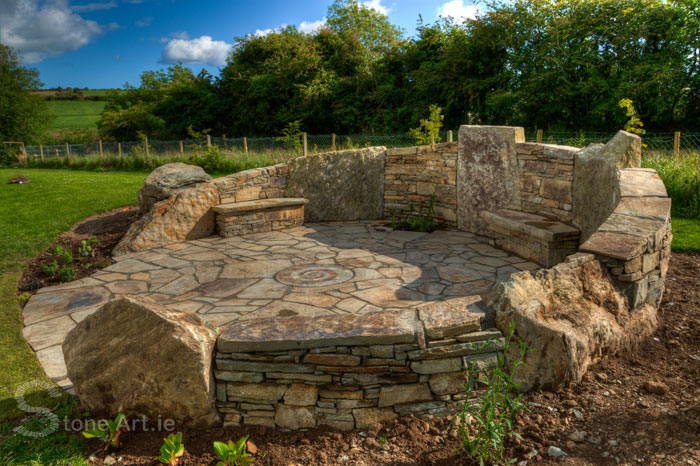
Here is a picture of a project I recently finished for an artist in West Cork. The mosaic in the center was actually a bit of an afterthought. The seating area was initially designed to have a fire pit in the center but later the client decided against the fire pit. I still wanted to have some sort of central feature, so I decided to put in a mosaic instead.
 I have been getting a lot of reaction to the mosaic I made for the center, I also have been getting some feedback from readers saying that they would like to see some more DIY projects posted on the blog. So I thought, why not show how I made this mosaic so people can give it a go themselves. 
Natural stone mosaic
I am in fact going to show two different ways of making mosaics. The first is made the more traditional way, using floor tiles of the same thickness, and the second way (which was a bit of an experiment) involved making a sort of upside-down mosaic cake!  

Mosaics are relatively easy to do and are a great project to get the whole family involved in. They make great features in a garden patio, on a wall or in a summerhouse. Anyone who has been to Gaudi’s, Park Güell, in Barcelona, Spain will know the endless creative possibilities with mosaic art.
The first mosaic I will demonstrate is the more conventional tile mosaic. This type of mosaic can be pre-made and slid into place later. This method is great because this means that it can be made on the kitchen table where the whole family can get around and be involved, it also means that it can be completed over a period of time.

This is in fact a mosaic I did for my parents some years back, I was finishing up a tiling job when I realised we were going to be short of tiles, the tiles were relatively cheap so the boxes came with many broken tiles. So I thought why not put the broken tiles to good use and make a mosaic (and save a trip to the tile store in the process).

So here are a few things you will need if you are going to give this a go!

The first step is to decide on your design, in my case it was a yin yang symbol, but be as creative as you like. Or if you are lacking inspiration, you can also find many mosaic designs and templates on the internet.
When you have decided on a design, transfer the design onto your sheet of plywood to the scale you desire.
Next stretch plastic wrap over the board (this will prevent the mosaic from sticking to the board). Then lay your tile mesh on the board. Use some tape or tacks to keep the mesh in place. If you are finding it difficult to see the design you may want to retrace the design onto the mesh.
If you are using old tiles try and use tiles of the same thickness as it will give you a more even finish. Also take care when breaking up the tiles as the tile fragments can be sharp, be sure to wear gloves and eye protection. It is also advisable to lay an old towel over the tiles as you break them to prevent the fragments from flying around the place.

Now you are ready to start laying the tiles. Using your paint brush put a blob of PVA glue on the back of each piece of tile as you position it on the mesh. (you want to be using enough glue to get a good bond with the mesh without getting to much excess glue squeezing out the sides and through the mesh)
 It can be quite tedious getting all the pieces to fit together like a big puzzle, but try not too worry about the gaps between the pieces as once they have been grouted you won't notice the gaps.
To fix the mosaic in place, get some tile glue either premixed or in powder form (just be sure that the glue is suitable for exteriors if the mosaic is outdoors, rapid set is also preferable). Using a tiling trowel spared an even layer of glue on the surface where the mosaic will sit, then carefully slide the mosaic into place. Lightly press down on the mosaic so that the glue starts to push through the mesh but try not to get it coming to the surface. Wipe off excess glue and leave to set. Once the glue is set to the manufactures specifications, mix up your grout (again make sure the grout is suitable for outdoors)  and squeeze into the gaps with a squeegee and remove residue with a sponge when it starts to set (usually only takes a few minutes). And there you have it, one finished mosaic!

So now I will show you the process I used to make the spiral mosaic for this seating area below.
Click here to see a video of the building of this project

So this mosaic was a bit of an experiment because I needed to make it off site, but I could not make it the conventional way (as above) either as I would be using natural stone which would be of variable thickness resulting in a very uneven finish so I decided I would try and make it similar to an upside down cake, that way the finished mosaic would be perfectly smooth and even.
Hole left in paving for mosaic
There are probably better ways of doing this, but I will now demonstrate the process I used to make this mosaic, using the materials I had to hand in my little garden shed.
So first of all, I knew I wanted to make a spiral and that it had to be a circular shape just under 80cm in diameter as this was the size of the hole I left in the paving for it.
I also wanted to use the same stone I used to create the surrounding paving, so before leaving the site I collected a number of pieces of stone averaging a thickness of about 1cm. In order to get a clear design I only selected pieces that were either light grey or dark brown, to maximize the contrast. I then took my measurements and my stone home with me to work on over the weekend.

So my first step was to come up with a design, I opted to go with a fairly simple spiral design as a very complex design would be very difficult to achieve using natural stone. I then transferred the design onto two large sheets of paper to get it to full scale. Remember if you are planning on trying one of these upside down type mosaics your template drawing should be back to front ( this is important if you have any lettering in your mosaic. Mine is just a spiral so it was not an issue)
I then attached the template onto a piece of plywood (approx 1m² in size) and drew a box around the outside of the circle. At the four points where the box and the circle meet, I attached pieces of 2”x2” timber onto the plywood, then using some strips of hardboard (nice and flexible) that I had laying in the shed, I created the circular mould that would contain the mosaic, by connecting the hardboard strips to the 2”x2” timbers I connected to the plywood.
I was now ready to start laying. (It is important to remember when laying the stone to put the side with the highest contrast facing down so that you end up with a better contrasting design when you're finished)
Laying completed
The picture above shows all the stones placed, however the contrast between the two coloured stones does not seem great. This is of course because we are looking at the underneath of the mosaic and I have the most contrasting sides of the stone facing away.
Next I got a large piece of plastic mesh and cut it to size (the mesh will help keep the mosaic in one piece and prevent it from cracking into little pieces when it comes to laying it later)
I then mixed up a half bag of cement fondue I had in the shed with some sand and water in a bucket into a creamy mixture (not too wet mind you) that would seep into the cracks  (a bag of quick drying cement should work fine as well)  I then poured half the mixture on to the mosaic and spread it out, careful not to move any of the stones.
I then added the plastic mesh and poured the rest of the mixture on top so that the mesh was sandwiched in the middle.
I then left it for a few hours to set. I waited till it was set long enough that it was hard but still soft enough that I could scratch the surface, the reason for this I will explain in a second. So the next task was to flip the mosaic over, to see if the experiment worked at to see if there was enough of a contrast between the two stones to show up the spiral properly.
To do this I put another sheet of plywood on top of the mosaic and screwed it into the 2”x2” timbers below, sandwiching the mosaic which allowed me to flip the mosaic over safely without damaging it. Then sliding the mosaic to the edge of the table I was able to take the screws back out and reveal my creation.
All that was left to do now was scrape any excess cement from between the cracks using a pointed tool (I used a pointed screwdriver and a nail) and brush clean. Because the cement was not completely set yet I was easily able to remove the excess glue.
From here the only thing left to do was transport the mosaic back to site and slide it into the hole on a bed of cement and grout it with a grey grout using the same technique mentioned earlier.
 So I hope this has inspired some of you to give mosaicing a go, and hopefully some of the information here will help you along the way. If you do give it a go, please post a photo of your mosaic creations (or indeed any of your other garden stone art creations) on my stone art facebook page so I can have a look. As for the rest of you who don't already know my facebook page do pop in and give us a 'like', I update the facebook page every few days with lots more interesting things as well as mini post, photos and more.

Saturday, July 31, 2010

Stone seats, the building process.

Best Blogger Tips
A few months back I wrote a post 'Stone Chairs. Some ancient some not so ancient…Yet….' in which I mentioned that one of my favorite things to build are stone seats. Well here is a stone seating area I have just completed and the process I used to create it.


So recently a lady in down in Co. Kildare asked me if I could transform this old area of her garden into one of my stone seating areas, so of course I was only too happy to oblige.


My delivery of stone.


So when the old material has been removed, the risers are built up.


For the top of the seats I often use big chunky slabs of stone like this (if I can get them). Depending on their weight, sometimes I need to get a mini digger to move them into place. However as there was a little movement in these ones, I decided to move them into place the old fashioned way, by using round timber stakes and leverage. It is hard going, but there is something very satisfying about doing it all by hand.


So when the seat tops are finished it is time to make the backs of the seats. This is the part that truly makes each seat unique.
When possible, I will actually go to the stone quarry and walk around and pick out the stone myself for a project. Unfortunately it has become increasingly difficult to find quarries that will let you loose in the quarry to go around picking out stone, as they are worried about getting sued.

So in this case I was unable to pick the stone myself, so I had to give a very detailed shopping list of exactly what I needed. This brought its own challenges, as you have to work with what you are given.
I try not to alter the stone too much, as I like to keep the natural edges of the stone. This way you keep all the stone's imperfections, keeping the whole thing looking more organic.
Laying the stone out on the ground I work out the layout for the backs of the seats. 


It is good to do this beforehand as once you get the stone in place, you really don't want to be moving it again.


Over the years you do learn some clever ways of moving large pieces of stone around without breaking your back. With pieces like this I walk them into place by rotating them on one corner, then doing the same with the other, slowly edging forward.


When all the main backing stones are in place, the smaller stones can be built up in between as can the stone around the back of the larger slabs.


And that's it, piece of cake really!
Well maybe not, it is hard work but it is also very rewarding work. Creating something unique and artistic like this can totally transform a garden and can be enjoyed for centuries to come!